
Disclaimer: I only recommend products I would use myself and all opinions expressed here are my own. This post may contain affiliate links and I may earn a small commission when you click on the link at no additional cost to you. As an Affiliate, I earn from qualifying purchases. I thank you for any purchases you make as it helps to maintain our ability of providing new Adventures and helps support my family.
Crayon Batik Art Adventure
A Fun and Easy Way to Create Beautiful Textile Art
It is a Crayon Batik Art Adventure! I recently discovered a new art technique that has quickly become one of my favorite: crayon batik. This unique art form combines the traditional Indonesian batik method with the colorful and versatile medium of crayons. The result is a beautiful and textured piece of art that is both easy and fun to create. While traditional batik, even some forms of crayon batik, use fabric dye in addition to the wax, this method of crayon batik does not.
Getting Started on our Design
To start, I gathered my materials: a white cotton fabric, a variety of crayons, an old metal muffin tin that you no longer use for cooking, an electric griddle, and some paintbrushes that can be dedicated to wax. Use a separate brush for each color. Set up the griddle and place the metal pan on top. Fill each cup with a different color of crayon, paper wrapper removed. Turn on the griddle and adjust temperature until the crayons began to melt. Monitor the melting and fine tune between staying melted and being too hot.
My friends and I then drew our designs onto the fabric with the pencil. You can also just wing it and paint on your own. Using the brushes to “paint” on the design, layer it very heavy with multiple layers to ensure a good strong color. It is advised to keep your design large and avoid too detailed a drawing. After melting, the designs tend to be more “loose” than specific lines.
Crayon batik art is a great activity for all ages and skill levels. It’s a fun way to experiment with color and texture, and the possibilities for designs are endless. Whether you’re looking for a new hobby or just want to try something new, I highly recommend giving crayon batik a try!
Materials
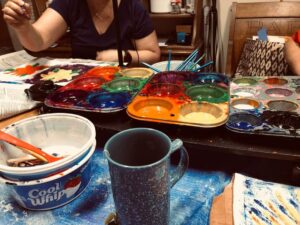
Getting ready for some crayon batik art adventure!
Crayons
I love using crayons for batik art because they are affordable, easy to find, and come in a wide range of colors. This is a perfect use for all those broken bits of crayon left after they loved by eager child hands. It doesn’t matter if each color is not the exact same hue as they will blend together when melted. When you are done, simply turn off the griddle and the melted crayon cups will harden to be used another day. They will also pop out if you want to store them in a bag or throw them away.
No crayon pieces lying around? Here are bulk crayons with no papers to remove! https://amzn.to/43rqZZA
Fabric
Choosing the right fabric is essential for crayon batik art. I prefer to use 100% cotton fabric as it takes the wax well and holds up nicely after washing. You can use any type of cotton fabric, such as muslin, broadcloth, or even an old t-shirt. Much of your decision on material will be based on your intended final product. Will this be a pillow cover, a tea towel, a wall hanging, a tote bag, or something you might want to wear?
Paintbrushes
Paintbrushes are necessary for applying the wax to the fabric. I recommend using a variety of sizes, from small detail brushes to larger brushes for covering larger areas. You can use any type of brush, but they will now be dedicated to wax! They can be used again and again. Simply brush off as much hot wax as possible then let them cool and dry. No need to clean the brushes between uses. When you pull them out again, the hard crayon on the brush will remelt when you place the brush in the hot melted crayon again.
Here is a brush I would recommend. https://amzn.to/43aOfet It is a basic brush that works well but not such high quality you would be sad to throw away if needed.
Iron
An iron is essential for removing the wax from the fabric after the painting process. I like to use a hot iron (set to the cotton setting – no steam) and several layers of newspaper or paper towels to absorb the wax. Be sure to iron the fabric on both sides to remove all of the wax. Place paper under the fabric as well as above it to avoid getting wax bleed through to the ironing board cover.
That’s it for the materials! With these items, you’ll be well on your way to creating beautiful crayon batik art.
Creating the Design
To begin my crayon batik art adventure, I first had to decide on a design. I wanted to create something colorful and abstract, so I decided to go with a swirl pattern. I sketched out my design on a piece of paper, making sure to keep it simple enough to be achievable with crayons.
Next, I transferred my design onto my fabric. I used a white cotton fabric and traced my design onto it using a pencil. I made sure to press down hard enough to leave a visible mark, but not so hard that it would be difficult to cover up with the crayons.
Once my design was complete, I began painting it in with the melted crayons. I used a variety of colors, blending them together to create a gradient effect. I made sure to fill in all the spaces, being careful not to go outside the lines.
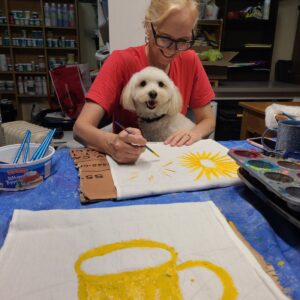
Getting help from Henry. I think he approves.
Removing the Wax
After I finished painting, I placed my fabric on an ironing board on top of several layers of newspaper. To make a print of my design first, I placed a large piece of white cardstock on top of my design. Then taking the hot iron, I slowly moved around the picture. This process will remove the wax while leaving the color. The wax may seep through the paper and helps you to know where you might need to iron more.
Without moving the cardstock too much, pick up a corner and look to see if the design on the paper is missing in any areas. If so, lower the paper again and iron over the missing area. When you are satisfied with the transfer, peel up the paper and set aside to cool. Take clean newspaper and put over the wax to iron off as much of the remaining wax as possible. The heat melted the crayons and transferred the wax onto the newsprint, leaving my design behind on the fabric.

Ironing the wax out.
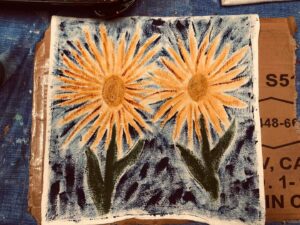
Once all the wax was removed, I was left with a beautiful and unique piece of art. I was amazed at how the colors popped and how the design was crisp and clear.
Overall, removing the wax was a simple process that required patience and attention to detail. It was well worth the effort to see the final product.
Finishing Touches
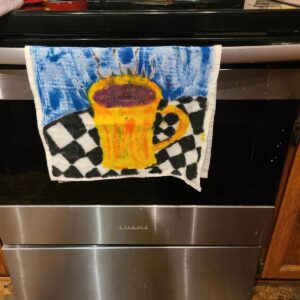
Because I used a tea towel and only painted on one half of it, I was able to fold it and sew the 2 sides together to make a pillow case. After stuffing it, I sewed up the remaining open side and now have a custom one of a kind pillow.
My friends made theirs with the intent to remain a tea towel. The first several times, it might be a good idea to hand wash in hot water and hang to dry. Before I washed and dried with other items, I would have to make sure no additional wax is coming off so it didn’t ruin some other item being dried with it.
Conclusion
This crayon batik art adventure has been a fun and exciting experience for me. I never thought that I could create such beautiful art using just crayons and fabric. I have learned a lot about the process of batik art and how to use crayons to create a wax resist.
Overall, I am very happy with the results of my crayon batik art adventure. This is a great activity for older kids who can appreciate the idea of painting with a hot melted wax and be properly aware of the burn factor.
0 Comments