
Bringing New Life to a Wooden Rocker
Disclaimer: I only recommend products I would use myself and all opinions expressed here are my own. This post may contain affiliate links and I may earn a small commission when you click on the link at no additional cost to you. As an Affiliate, I earn from qualifying purchases. I thank you for any purchases you make as it helps to maintain our ability of providing new Adventures and helps support my family.
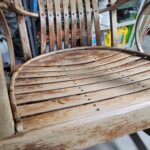
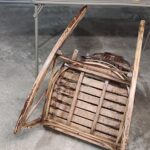
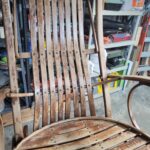
Staining a wooden chair or rocker can be a fun and rewarding DIY project. With the right materials, you can easily transform an old piece of furniture into a beautiful piece that looks brand new. In this blog post, we’ll go through the steps required to stain a chair with stain and polyurethane/varnish. Luckily, I did not have to strip the varnish off of the piece first. It was worn enough that I was able to successfully redo the rocker without a lot of prep fuss.
First, depending on the condition of the wood piece and previous finish, you may need to sand the entire chair with a 120-grit sandpaper until the surface is completely smooth. In this particular case, a light sanding was enough. In instances that the previous finish is rough, very patchy, or the wood itself is not smooth, you can use the DEWALT DWE6423K Random Orbit Sander to make the job easier and faster. It has a powerful motor and a dust-sealed switch to protect against dust ingestion, making it a durable and reliable tool.

Stain – The Fun Part
Once the chair is sanded, wipe it down with a clean rag damp with a little mineral spirits. It will get the dust and any residue grime off. It dries quickly so there is no real delay getting to the fun part! The stain! To me, this is where the real magic happens and you feel like a sculptor or painter creating a masterpiece. Let’s get started staining the wooden rocker!
Minwax and Verathane are popular brands. I have used both with great results. Another tip, a little goes a LONG way. There is a reason most of the stains are sold in small cans.
One thing I recommend about the stain, especially if you are not sure of the color you want or how the wood is going to absorb the stain, is to start in an inconspicuous area. Use the underneath, the bottom of a drawer, the back of a cabinet door.
Because of my venture into gel stain years ago, ( I LOVE General Finishes brand, by the way) the back side of one of my bathroom cabinet doors is a variety of colors. Tried different ones until I found the right combination. The same is true for regular stain. You can mix, you can overlap, you can always go darker. Find the right shade to match what you are looking for.
All in One Products – Stain and Sealer Together
There are products that have the stain and sealant all in one product, for one step application. Minwax is a well known brand and has a large selection of shades available. It is a great one-step solution that lets you skip the steps of applying and wiping off stain, and waiting for it to dry so you can apply a coat of poly. This product can be applied with a brush or a cloth and dries in 15 to 30 minutes. Minwax All in One
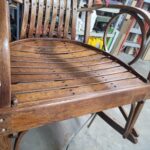
After the stain has dried about 24 hours, you can apply a coat of polyurethane or varnish. The basic difference between the two for me is that varnish is great for things that will be in high humidity, actually wet, or in direct sunlight. There are lots of detailed information resources online to help you decide which you need. For my project here, since the rocker will be on the porch, even though it is covered, I chose a Spar Urethane – Minwax Helmsman Spar Urethane.
You can apply the sealant (varnish or polyurethane) with a brush or a sponge brush and wait for it to dry before applying a second coat. I used an inexpensive foam brush as I will probably toss it when I am done. Follow the directions on your particular can of sealant as to length of dry time required or until it is “cured” and ready to use.


Watch the Transformation
For me, I have always loved the process of staining and sealing wood. It is possible to return an antique piece to its former glory or make a simple piece of wood into a thing of beauty. The transformation is usually incredible.
Give it a try. There are plenty of inexpensive pieces of furniture at a thrift store or even along the side of road on trash day to use to practice. It is not a difficult process to learn and no special equipment required.
0 Comments